Image Generator with Blazor
Hello guys, happy Friday! Today I will inaugurate a new section that will be called “API Friday”. What will this API Friday be about? well, basically every Friday(or every two Fridays) I will post a .net project(blazor, asp net MVC, web API, etc.) made using a cool web API, for example, a project like my Blazor Pokedex done with the pokemon API.
I’m really excited to open this new section as it’s been a while since I was looking forward to doing it. I promise that all the projects will be cool & fun and you can use them to showcase them on your developer portfolio to get a job.
These projects will go from simple applications displaying some data like the blazor pokedex to more complex applications not only fetching the API but also using it to complement a much bigger application.
Today’s web API
For this project, we will be using the Lorem Picsum web API basically what this web API does is that depending on the query parameters that you pass into the request URL it will randomly generate an image with some filters and the specified dimensions so you can use them on your personal projects.
The documentation is pretty straightforward so you can go and read it once and I’m pretty sure that you will be able to use it. This API does not return a JSON response instead it gives us the raw image to use it directly so we will not be using an Http Client for this project as we used on the blazor pokedex.
So without further ado let’s get into the coding!
Create a new blazor wasm empty project
Create a new blazor WebAssembly empty project, for this, you need to have the dotnet latest version as of now (dotnet 7.0). Now create the project using the dotnet cli.
dotnet new blazorwasm-empty -o ImageGenerator
We are using this template to avoid having the boilerplate code that the normal blazor wasm project has by default.
Add the image model
Add a Models folder to the root of the project and inside it create a new model named Image and add the following code.
public class Image
    {
        public string Width { get; set; }
        public string Height { get; set; }
        public bool HasId { get; set; }
        public int ImageId { get; set; }
        public bool Grayscale { get; set; }
        public bool Blur { get; set; }
        public int BlurLevel { get; set; }
        public string Extension { get; set; }
    }
This model contains the properties that we will need to specify to generate a random image if you would like to know more about these properties you can go and read the API documentation for a better understanding.
Image Settings class
To give the image the properties we want we will use a fluent builder-like class to build the image along with its properties.
public class ImageSettings
{
    private Image image;

    public ImageSettings()
    {
        image = new Image();
    }

    public ImageSettings SetWidth(string width){
        image.Width = width;
        return this;
    }

    public ImageSettings SetHeight(string height){
        image.Height = height;
        return this;
    }

    public ImageSettings SetGrayscale(bool hasGrasyScale){
        image.Grayscale = hasGrasyScale;
        return this;
    }

    public ImageSettings SetBlur(bool hasBlur, int blurLevel = 0){
        image.Blur = hasBlur;
        image.BlurLevel = blurLevel;
        return this;
    }

    public ImageSettings SetImageId(bool hasId,int id){
        image.HasId = hasId;
        image.ImageId = id;
        return this;
    }

    public ImageSettings SetImageExtensions(string extension)
    {
        image.Extension = extension;
        return this;
    }

    public Image Build(){
        return image;
    }
}
What this class does is set the values for all the Image properties and then return the Image object.
Link Builder class
This web API does not need us to communicate to it via an HTTP Client class, instead, we only need to use the API URL followed by the query parameters needed to generate the image. So we need a way to build the URL with the parameters we passed to the ImageSettings class and that will be the work of the LinkBuilder class.
public static class LinkBuilder
{
    public static string BuildLink(Image image)
    {
        var sb = new StringBuilder("<https://picsum.photos>");

        if (image.HasId is true)
        {
            sb.Append($"/id/{image.ImageId}");
        }

        sb.Append($"/{image.Width}");

        if (image.Height is not null)
        {
            sb.Append($"/{image.Height}");
        }

        if (!string.IsNullOrEmpty(image.Extension))
        {
            sb.Append($".{image.Extension}");
        }

        if (image.Blur is true && image.Grayscale is true)
        {
            sb.Append("?grayscale&blur");

            if (image.BlurLevel > 0)
            {
                sb.Append($"={image.BlurLevel}");
            }
        }
        else
        {
            if (image.Grayscale is true)
            {
                sb.Append("?grayscale");
            }

            if (image.Blur is true)
            {
                sb.Append("?blur");
                if (image.BlurLevel > 0)
                {
                    sb.Append($"={image.BlurLevel}");
                }
            }
        }

        return sb.ToString();
    }
}
This class accepts an Image class as a parameter and it uses a StringBuilder to build the URL going through a set of if statements to check for every property the Image holds to build it.\
Let’s add the code & markup to Index.razor
Now let’s go into the main Index file that will display our application. Let’s begin by adding some code using the @code{ tag instead of the @ tag.
@code {
    //Fields & Properties
    private string height;
    private string width;
    private bool hasGrasyScale;
    private bool hasBlur;
    private int blurLevel = 1;
    private string imageExtension;
    private int imageId;
    private bool hasId = false;
    private bool isIdInputDisabled = true;
    private bool isBlurInputDisabled = true;
    private string imageSrc = "";

    //Functions
    void GenerateImage()
    {
        Image randomImage = new ImageSettings()
                            .SetWidth(width)
                            .SetHeight(height)
                            .SetGrayscale(hasGrasyScale)
                            .SetBlur(hasBlur, blurLevel)
                            .SetImageExtensions(imageExtension)
                            .SetImageId(hasId, imageId)
                            .Build();

        imageSrc = BuildLink(randomImage);

        Console.WriteLine(imageSrc);
    }

    string BuildLink(Image image) => LinkBuilder.BuildLink(image);

    private void DisableIdInput()
    {
        isIdInputDisabled = !isIdInputDisabled;
        hasId = !hasId;
    }

    private void DisableBlurInput()
    {
        hasBlur = !hasBlur;
        isBlurInputDisabled = !isBlurInputDisabled;
    }
}
We set a field for all the parameters that our image will need to be followed by the GenerateImage function that as the name says will generate our random image using the ImageSettings class and the BuildLink method and then it prints the image URL just for debugging purposes and lastly the disable input functions will be triggered every time the checkboxes checked state changes.
Now add some markup
The frontend part of the application will consist of a sidebar with a set of inputs for the user to select the dimensions and filters of the image to be generated and the content section will hold the image once we submit the form.
@page "/"
@using Util
@using Models

<div class="main-container d-flex">

    <div class="sidebar" id="side-nav">

        <h4 class="my-3">Image Dimensions</h4>
        <div class="col-10 mx-3 mb-2">
            <label for="" class="form-label">Width</label>
            <input class="form-control" type="number" placeholder="Width" @bind="@width" />
        </div>

        <div class="col-10 mx-3 mb-3">
            <label for="" class="form-label">Height</label>
            <input class="form-control" type="number" placeholder="Height" @bind="@height" />
        </div>
        <hr>

        <h4 class="my-3">Specific Image</h4>

        <div class="col-10 mx-3 mb-3">
            <div class="form-check">
                <input id="imageId" class="form-check-input" type="checkbox" @onchange="@DisableIdInput" />
                <label for="imageId" class="form-check-label">Use Image Id</label>
            </div>
        </div>

        <div class="col-10 mx-3 mb-3">
            <label for="" class="form-label">Image Id</label>
            <input class="form-control" type="number" placeholder="Image Id" @bind="@imageId"
                disabled="@isIdInputDisabled" />
        </div>
        <hr>

        <h4 class="my-3">Filters</h4>

        <div class="col-10 mx-3 mb-3">
            <div class="form-check">
                <input id="grayscaleCheck" class="form-check-input" type="checkbox" placeholder="Grayscale"
                    @bind="@hasGrasyScale" />
                <label for="grayscaleCheck" class="form-check-label">Grayscale</label>
            </div>
        </div>

        <div class="col-10 mx-3 mb-3">
            <div class="form-check">
                <input id="blurCheck" class="form-check-input" type="checkbox" placeholder="Blur"
                    @onchange="@DisableBlurInput" />
                <label for="blurCheck" class="form-check-label">Blur Image</label>
            </div>
        </div>

        <div class="col-10 mx-3 mb-3">
            <label class="form-check-label" for="">Blur level</label>
            <input class="form-control" type="number" placeholder="Blur Level" @bind="@blurLevel"
                disabled="@isBlurInputDisabled" min="1" max="10"/>
        </div>

        <div class="col-11 d-flex justify-content-end">
            <button class="btn btn-primary" @onclick="@GenerateImage" type="button">
                Generate Image
            </button>
        </div>
    </div>

    <div class="container">
        <div class="my-3 d-flex justify-content-center">
            <h1 class="app-title">Image Generator</h1>
        </div>

        <div class="d-flex justify-content-center mt-3 mb-4">
            <img src="@imageSrc" alt="" srcset="">
        </div>
    </div>
</div>
Install Bootstrap 5
For the styling we will be using bootstrap and just a little bit of custom css, but before we need to install bootstrap using Libman. Open the console inside visual studio code and run the following commands.
libman init
libman install twitter-bootstrap@5.2.3
Then you will be prompted to select the folder destination, if you select the default destination you should have something like the following.

Now go into index.html file and insert the cdn link tag to bootstrap and another css link tag to our project, this should have the name of your project, mine is ImageGenerator.
<link href="<https://cdn.jsdelivr.net/npm/bootstrap@5.0.2/dist/css/bootstrap.min.css>" rel="stylesheet" integrity="sha384-EVSTQN3/azprG1Anm3QDgpJLIm9Nao0Yz1ztcQTwFspd3yD65VohhpuuCOmLASjC" crossorigin="anonymous">
<link rel="stylesheet" href="Imagegenerator.styles.css">
<link href="css/app.css" rel="stylesheet" />
Add some styling with CSS
Now let’s add some styling for the sidebar to display correctly, the container to prevent big images to overflow and cover the entire page, and the color of the inputs when they are disabled.
#side-nav {
    background: #30343F;
    min-width: 250px;
    max-width: 250px;
    color: #fff;
    padding-left: 10px;
}

.container {
    min-height: 100vh;
    width: 100%;
    overflow: scroll;
    padding: 10px;
}

input[type="number"]:disabled {
    background: #aaa;
}
Give the application a test!
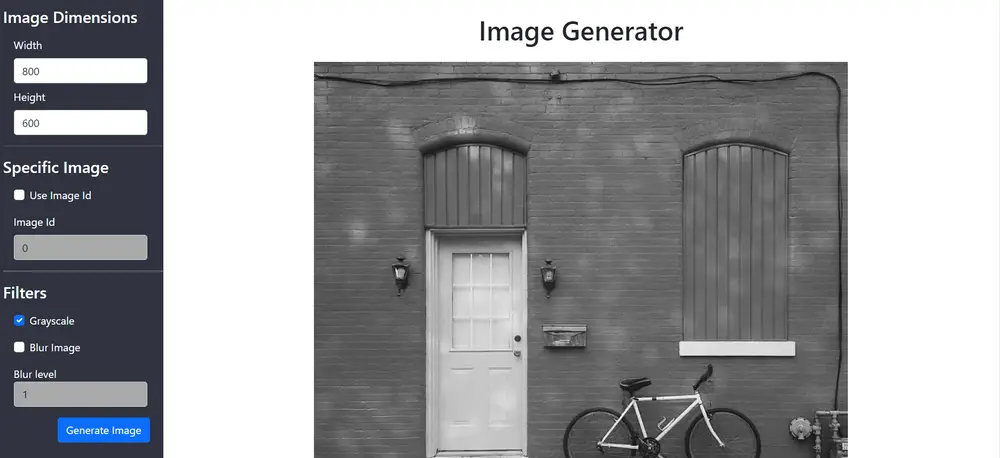
Now you should be ready to test the app, run the project using the dotnet commanddotnet run and once you specify the dimensions and filters for the image you should be able to see something like the following.

Here we are generating a random image with the specified dimensions(800x600) and applying a grayscale filter.
All collaborations are welcome
If you have any improvement ideas on the design, code, or uses of the application you are free to clone the GitHub repo to submit a pull request as this project is not only mine but yours also, if you desire to use this on your portfolio you are free to do it and to submit any improvement or bug fixes.
And before I leave I must say that I forgot to add the input to select the image extension 🙄, all the functionality is there I just forgot to add the markup to select it, so that’s something you could add as the first pull request anyways I’ll try to fix that on my free time later.
 Osempu
Thanks for reading!
Thanks for joining me on this first issue of this “Friday API” series, I’m already excited for the next week’s project. I’m also planning on making it a lot better than this one even though I did my best to create a project that you could use and showcase to your friends or in your portfolio. Don’t forget to follow me on my blog Unit Coding to know when I release the next project and also to read useful posts on C# and .net development to make yourself a better developer. Thanks and see you soon!