How to Use Patch Requests to Update Resources in Your REST API
Hello guys, Oscar here with another amazing chapter on REST API Development with ASP NET 7. Today we have an amazing and relevant topic for our APIs to have more power and flexibility at the time of updating our API resources.
If you're familiar with HTTP requests, you've probably heard of GET, POST, PUT, and DELETE. But have you heard of PATCH? In this article, we'll explain what a PATCH request is, why it's useful, and how you can use it, also I will show you the different type of operations that the patch method supports and how you can implement it on your own web API so without further ado let’s get into the action.
What is the Patch Request ?
The PATCH request is an HTTP method that is used to partially update an existing resource. With PATCH, you can modify specific attributes of a resource without having to send the entire resource back to the server.
For example, let's say you have a user profile that includes a name, email address, and phone number. If the user updates their phone number, you could use a PATCH request to send only the new phone number to the server, rather than sending the entire user profile this means a great improvement in flexibility at the time of updating large objects because you will no longer have to provide and update all the resource properties but only the ones that you want.
Why is Patch Request Useful ?
Patch request offers several benefits.
Firstly, it can be more efficient than other HTTP methods. If you only need to modify a small part of a resource, sending the entire resource to the server can be unnecessary and time-consuming. By using PATCH, you can reduce the amount of data that needs to be sent, which can improve performance.
Secondly, PATCH is useful when you need to make incremental changes to a resource. For example, if you want to update a user's email address and phone number separately, PATCH allows you to do this without overwriting any other attributes of the resource.
Finally, using PATCH can be beneficial for ensuring data consistency. If you use PUT to update a resource, you must send the entire resource to the server, even if only one attribute has changed. This can result in other attributes being overwritten accidentally. PATCH, on the other hand, allows you to modify only the attributes you want to change, reducing the risk of unintended consequences.
Different Patch Operations
There are six different patch operations:
Add
This operation adds a new value to a property.
{
	"op": "add",
	"path": "/title",
	"value": "new value"
}
Remove
Removes the value from a property or sets it to a default value.
{
	"op": "remove",
	"path": "/title"
}
Replace
Replaces a value to a new one. It is the equivalent of a remove operation followed by an add operation.
{
	"op": "replace",
	"path": "/title",
	"value": "new value"
}
Copy
Copies the value from one location to another(property) using two JSON pointers from and path.
{
	"op": "copy",
	"path": "/title",
	"from": "/author"
}
Move
Moves a value from one location to another(property) using two JSON pointers from and path.
{
	"op": "move",
	"path": "/title",
	"from": "/author"
}
Test
Tests if a property has an expected value. if the test fails, then the patch as a whole should not apply.
{
	"op": "test",
	"path": "/title",
	"value": "test value"
}
Example of a Patch Request Body
[
	{
        "op": "replace",
        "path": "/title",
        "value": "new title"
	},
	{
        "op": "add",
        "path": "/author",
        "value": "new author"
	}
]
In the code example above you can see that the request starts with a pair of square brackets that represents an array, in this case, is an array of operations, and every operation starts and is delimited by a pair of curly braces, meaning that you can execute a set of operations to an object and not just one.
Then every operation has an op property representing the type of operation you are executing, then the path property specifies on which property or field you will execute the operation, and finally, the value property specifies the value that will be used in the operation.
This is a pretty basic example because as you know you can use properties like from that are JSON pointers that gives you a lot of possibilities working with the patch method.
Clone the Repository from GitHub
Before starting to code I recommend you to go and get the code from the GitHub repository so you can follow along with this example. Make sure you get the code from the Sorting branch to have the latest version of the code up to this article.
 Osempu
Install required Nuget Packages
In order to support the Patch requests we need to install two required libraries:
The Microsoft.AspNetCore.JsonPatch provides the JsonPatchDocument class type.
The Microsoft.AspNetCore.Mvc.NewtonsoftJson provides the NewtonSoftJson serializer into the application.
You can install these two Nuget Packages with the following dotnet cli command:
dotnet add package Microsoft.AspNetCore.JsonPatch
dotnet add package Microsoft.AspNetCore.Mvc.NewtonsoftJson
Register NewtonsoftJson in the Program file
In order to use the Newtonsoft library you have to add it as a service into the Program file after adding the controllers.
builder.Services.AddControllers()
                .AddNewtonsoftJson();
Now you are ready to implement the Patch method in the Post controller.
Implementing the Patch method
using Microsoft.AspNetCore.JsonPatch;
//code omitted for brevity

[HttpPatch("{id:int}")]
public async Task<ActionResult> PatchPost(int id, [FromBody] JsonPatchDocument<Post> doc)
{
    var post = await repository.GetPostAsync(id);

    if(post is null)
    {
        return NotFound();
    }

    doc.ApplyTo(post);
    await repository.EditAsync(post);

    return NoContent();
}
First import the Microsoft.AspNetCore.JsonPatch namespace to support the Patch method and add the HttpPatch attribute to the PatchPost endpoint.
This Patch endpoint accepts the Post id and a JsonPatchDocument<T> as the payload and it will get it from the body so add the [FromBody] attribute to this parameter.
You have to get the Post to update using the GetPostAsync(id) method from the repository class, then if the post is null return a NotFoun HttpResponseCode to notify that the resource does not exist.
Finally, use the ApplyTo() method to merge the changes into the request to the targeted resource. Then update the Post and return a NoContent HttpResponseCode.
For further information about the patch method visit https://jsonpatch.com/
Test the Patch method with Postman or swagger
Now you should be ready to test the new patch endpoint updating a single value from one of your posts. Below is an example of how to perform a replace operation to a post.
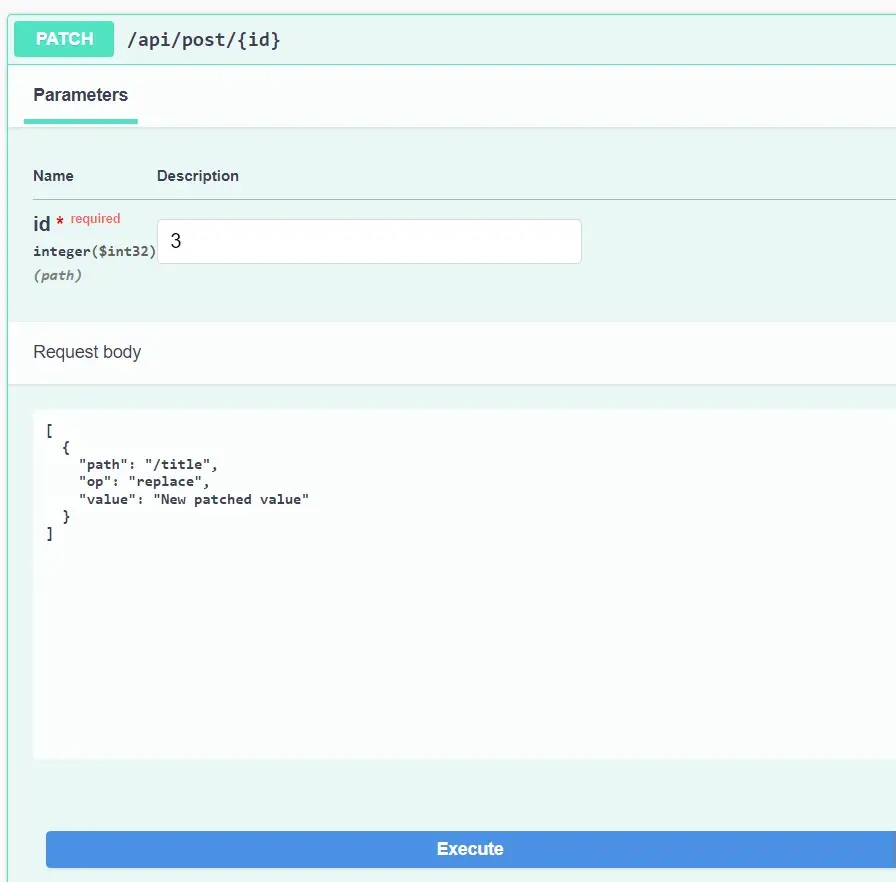
First, you need to input the id from the post you want to update and send the JSON payload in the format
Conclusion
HTTP PATCH is a useful method for updating resources partially and incrementally. By sending only the changes you want to make, you can reduce the amount of data sent, improve performance, and reduce the risk of unintended consequences. If you're working with APIs or web applications that allow partial updates, consider using PATCH to optimize your requests.
Follow me for more Web Development content
Keep posted if you want to grow your career as a Web Developer/Software Engineer as I’m constantly updating content on my Blog Unit Coding also follow me on Twitter as Oscar Montenegro where I’m starting to post my #100DayOfCode journey.
Thanks for reading my article and I will see you on the next one, Happy coding everybody!