Build a Google Translate Clone with Blazor and .NET
Hello guys, it’s Friday and you know what it means right? Yeah, it’s API Friday so I guess I should have started saying H-API Friday to you all (ba dum tss). I’m really excited about the project that I got between hands for you. I did my best to present you something with almost full functionality something you can showcase in your developer portfolio if you are a beginner, and don’t worry I will start to create some projects for intermediate and advanced developers just have a little patience as I’m focusing right now on new .NET developers.
Today’s project is a clone of the google translate app using Google’s translate API v2. I’m a visual person so today I will present you with a nice-looking application, however, it will not only be a “pretty “ app it will also translate text, detect a language based on the user input, display the supported languages, and swap user input with translation result. So if you are as excited as I am to start coding let’s go for it!
Google Translate API Setup
First, you need to follow some steps in order to be able to use the Google Translate API.
- Create a Google account or use your existing account if any
- Access google cloud
- Go to the google cloud console
- Create a new project and name it whatever you want mine was named
Google Translate Clone - Access your and look for
Cloud Translation API - Enable the API and it will ask you to enable billing in your account
- Enable billing as well (don’t worry we will not spend a penny on this project)
- In your project view go to
APIs and services>Credentials - Select
Create Credentialsand then selectAPI Key
After you have followed these steps you can start using your API key for this and many other projects.
If for some reason you failed to follow the steps and need further help you can watch this video where he follows the same steps I listed above but you can see the Google Cloud interface and appreciate it more visually.
Alternative to accessing Google Cloud
if you don’t like the idea of accessing Google Cloud and enabling a billing account you can access Rapid API which is an API marketplace where you can find tons of APIs to use, you would need to create an account and then look for the Google Translate API and subscribe for free after this you will have access to the credentials Rapid API provides you without you having to access Google Cloud or enable a billing account but you would need to send two special headers on every request but don’t worry Rapid API got you covered and actually provides you with an example call so you know how to call the API from their host and it will look something like this
var client = new HttpClient();
var request = new HttpRequestMessage
{
	Method = HttpMethod.Post,
	RequestUri = new Uri("<https://google-translate1.p.rapidapi.com/language/translate/v2/detect>"),
	Headers =
	{
		{ "X-RapidAPI-Key", "YOUR_API_KEY" },
		{ "X-RapidAPI-Host", "google-translate1.p.rapidapi.com" },
	},
	Content = new FormUrlEncodedContent(new Dictionary<string, string>
	{
		{ "q", "English is hard, but detectably so" },
	}),
};
using (var response = await client.SendAsync(request))
{
	response.EnsureSuccessStatusCode();
	var body = await response.Content.ReadAsStringAsync();
	Console.WriteLine(body);
}
Create a new Blazor WebAssembly App
Now that you have access to the Google Translate API let’s start creating a new blazor wasm app with the aid of the dotnet cli.
dotnet new blazorwasm-empty -o GoogleTranslateClone
As always go to your wwwroot>Index.html file and uncomment your scoped CSS stylesheet as by default this line is always commented and you have to enable it by yourself.
<link href="GoogleTranslateClone.styles.css" rel="stylesheet" />
Add the Models to store the data
We need some models to store the data that we are getting back from the web API calls so let’s add a folder called Models and let’s create the following model classes.
public class Language
{
    [JsonPropertyName("language")]
    public string language { get; set; }

    [JsonPropertyName("name")]
    public string name { get; set; }
}

public class TranslatedText
{
    [JsonPropertyName("translatedText")]
    public string translatedText { get; set; }
}
We added a Language model to store the collection of supported languages from the API and the TranslatedText class to store the response from the translation endpoint. We are using the JsonpropertyName to map the JSON response to our model properties on deserialization.
Create GoogleTranslateClient class
As we are calling a web API we need a client class that consumes its endpoints so for that reason let’s add a new folder called Client and inside it we will create the GoogleTranslateClient class.
public class GoogleTranslateClient
{
    private const string baseAddress = "<https://translation.googleapis.com/language/translate/v2>";

		private readonly HttpClient client;

    public GoogleTranslateClient(HttpClient client)
    {
        this.client = client;
    }
}
We start by adding a constant that will hold the base address of the client which is the Google API address. After this, we add a constructor and pass an HttpClient as a parameter to instantiate the client via dependency injection in the Program class.
Now this is not everything but I don’t want to throw a bunch of lines of code in front of you and expect you to understand it all like that. So I will explain every method of the client separately.
GetSupportedLanguages methods
With this method as the name suggests we intend to get a collection of the languages the Google API supports.
public async Task<Dictionary<string,Language>> GetSupportedLanguages()
{
    var queryParams = new Dictionary<string, string>()
    {
        ["key"] = "YOUR_API_KEY",
        ["target"] = "en"
    };

    var uri = QueryHelpers.AddQueryString($"{baseAddress}/languages", queryParams);

    var response = await client.GetAsync(uri);
    string content = await response.Content.ReadAsStringAsync();

    var data = JsonObject.Parse(content);
    var languagesNode = data["data"]["languages"];
    var languages = JsonSerializer.Deserialize<List<Language>>(languagesNode)
                        .ToDictionary(x => x.language);
    return languages;
}
Nothing super special or out of the world we start by creating a string dictionary to store the API key and the target language. We use the QueryHelpers class to add the query string seamlessly just passing the address and the query params as parameters but in order to use the QueryHelpers class you need to install a Microsoft library so prepare your terminal to use the dotnet cli.
dotnet add package Microsoft.AspNetCore.WebUtilities
Now you should be able to use it without getting any errors. Then we send the request and parse it to a string as always. Now here comes the hacky stuff, in order to avoid creating a bunch of models to get the languages data I work directly with the JSON nodes and dive into its properties to get the languages to finally just deserialize into a list and call the ToDictionary method to return a Dictionary.
DetectLanguage method
Have you ever found a piece of text that you would like to translate but don’t know in which language is it written? well, what this method does is detect the language based on the input the user gives.
public async Task<Language> DetectLanguage(string input)
{
    var queryParams = new Dictionary<string, string>()
    {
        ["key"] = "YOUR_API_KEY",
        ["q"] = input
    };

    var uri = QueryHelpers.AddQueryString($"{baseAddress}/detect", queryParams);

    var response = await client.PostAsync(uri, null);
    var content = await response.Content.ReadAsStringAsync();

    JsonNode data = JsonNode.Parse(content);
    JsonNode languageNode = data["data"]["detections"][0][0];
    Language language = JsonSerializer.Deserialize<Language>(languageNode);

    return language;
}
We start creating the same string dictionary to store the API key and in this case, we pass the parameter q which is the user input to analyze and detect the source language. Everything is the same, we call the QueryHelpers class to pass the query strings, send the post request and read the response as a string to parse into a JsonNode to manipulate the node data manually and deserialize into a Language object and proceed to return it.
Translate method
Finally, the method to translate the input from the client to the desired language.
public async Task<TranslatedText> Translate(string input, string source, string target)
{
    var queryParams = new Dictionary<string, string>()
    {
        ["key"] = "YOUR_API_KEY",
        ["q"] = input,
        ["target"] = target,
        ["source"] = source
    };

    var uri = QueryHelpers.AddQueryString(baseAddress, queryParams);

    var response = await client.PostAsync(uri, null);
    var content = await response.Content.ReadAsStringAsync();

    JsonNode data = JsonNode.Parse(content);
    JsonNode translateNode = data["data"]["translations"][0];
    TranslatedText translation = JsonSerializer.Deserialize<TranslatedText>(translateNode);

    return translation;
}
This method takes three parameters, the input which is the sentence to translate, the language in which the sentence is written, and the target language to translate.
We pass these three parameters as query strings in the queryParams dictionary and use the QueryHelpers class to pass the query params to the request. We perform the post request and parse the response to a string to finally parse into a JSON node to get into its properties and get the translated text.
This is it for the GoogleTranslateClient so let’s add it to the services collection in the Program class.
builder.Services.AddScoped<GoogleTranslateClient>();
Add markup to Index.razor file
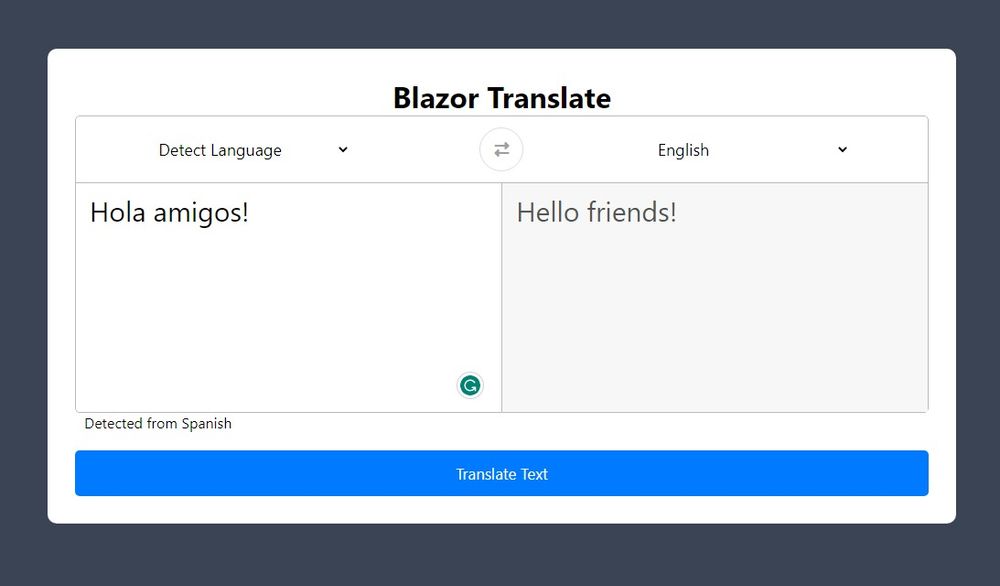
This is our main file so we will add all the markup here, we will not be creating any components although we could have as we will have some repeated markup for this example we did it all inside a single file without components but you can definitely do it and improve the app in many ways.
<div class="container">
    <h1>Blazor Translate</h1>
    <div class="wrapper">
        <ul class="controls">
            <li class="row from">
                <select name="language-select" title="language-select" @bind="@sourceLanguage">
                    <option value="">Detect Language</option>
                    @foreach (var language in supportedLanguages)
                    {
                        <option value="@language.Key">@language.Value.name</option>
                    }
                </select>
            </li>

            <li class="exchange" @onclick="@ChangeSourceToTarget"><i class="fas fa-exchange-alt"></i></li>

            <li class="row to">
                <select name="language-select" title="language-select" @bind="@targetLanguage">
                    @foreach (var language in supportedLanguages)
                    {
                        <option value="@language.Key">@language.Value.name</option>
                    }
                </select>
            </li>
        </ul>

        <div class="text-input">
            <textarea class="from-text" name="" id="" cols="30" rows="10" placeholder="Enter Text"
                @bind="@sourceText"></textarea>
            <textarea class="to-text" name="" id="" cols="30" rows="10" readonly disabled placeholder="Translation"
                @bind="@translatedText"></textarea>
        </div>
    </div>
    <div class="detected-text">
        @if (!string.IsNullOrEmpty(notificationText))
        {
            <p>@notificationText</p>
        }
    </div>
    <button @onclick="@Translate">Translate Text</button>
</div>
We define some basic HTML markup but there are some parts that I would like to point out and that is that we are populating the select controls using the supported languages method using a foreach loop to create an option tag for every supported language.
Also, we added a button to change the source text with the target text, this is to swap the content to translate with the translated content.
There are two textarea controls to input the text to translate and to display the translation, below this, we have a notification to display some messages for example to input a valid text if the textarea is empty or to notify the user when a text is translated from a language and finally a button to execute the translation.
Add the code to the Index.razor file
@code {
    private string sourceLanguage;
    private string targetLanguage = "en";
    private string sourceText;
    private string translatedText;
    private string notificationText;

    private Dictionary<string, Language> supportedLanguages = new Dictionary<string, Language>();

    protected override async Task OnInitializedAsync()
    {
        supportedLanguages = await GetSupportedLanguages();
    }

    private async Task<Dictionary<string, Language>> GetSupportedLanguages()
    => await client.GetSupportedLanguages();

    private async Task<Language> DetectLanguage(string input)
    => await client.DetectLanguage(input);

    private async Task Translate()
    {
        notificationText = string.Empty;
        if(string.IsNullOrEmpty(sourceText))
        {
            notificationText = "Insert a valid text to translate";
        }
        else if (string.IsNullOrEmpty(sourceLanguage))
        {
            Language detectedLanguage = await DetectLanguage(sourceText);
            var translationResult = await client.Translate(sourceText, detectedLanguage.language, targetLanguage);
            translatedText = translationResult.translatedText;
            if (supportedLanguages.TryGetValue(detectedLanguage.language, out Language language))
            {
                notificationText = $"Detected from {language.name}";
            }
        }
        else
        {
            var translationResult = await client.Translate(sourceText, sourceLanguage, targetLanguage);
            string decodedString = HttpUtility.HtmlDecode(translationResult.translatedText);
            translatedText = decodedString;
        }
    }

    private void ChangeSourceToTarget()
    {
        string tempSource = "";
        string temptext = "";

        tempSource = sourceLanguage;
        temptext = sourceText;

        if (string.IsNullOrEmpty(tempSource))
        {
            tempSource = "en";
        }

        sourceLanguage = targetLanguage;
        sourceText = translatedText;

        targetLanguage = tempSource;
        translatedText = temptext;
    }
}
At the top, we define some fields to store the values of the select controls and text areas and we initialize a SupportedLanguages property and populate it in the life cycle method OnInitializedAsync with the aid of the GetSupportedLanguages method which as we remember returns a dictionary containing the supported languages.
The detect language method does a call to the client detect language method and returns the language code. Now the translate method is where almost all the magic happens, we set the notificationText field to empty as we want to clear any old messages then we check if the sourceText property is not empty (which is the text to translate), if it is then we display an error message then we proceed to check if the sourceLanguage is not empty (this is the language of the text we want to translate), but if it’s empty then this means we want to detect the language so we call the detect language function and return the language in which it is written, then we proceed to translate the text now that we know the source language, decode the response as the response contains some HTML codes and finally, we check in the supported languages dictionary to look for the name of the detected language as the detect language function return the language code (eg. en, es, de, fr) but not the actual name, so once we know the language we print a notification displaying the language from which the text was translated. Following with the last case of the conditional statement if both the sourceLanguage and sourceText are not empty then we proceed to perform a normal translation without any additional tasks.
The final method is actually a utility method to swap the left side of the translate app with the right side so for that we define some temporary variables and start swapping values, we have a conditional statement checking if the select control from the left side was empty then we will change its value to “en” this is because we cannot send an empty value to the targetLanguage as this would cause an error because we need to know the target language always, then we continue with the swap and that’s it.
Adding styling to the app
The app is ready to work and rock but it still looks ugly so we will start adding some styling. Let’s begin by adding a style link in the index.html file to use font awesome to add some icons.
<link rel="stylesheet" href="<https://cdnjs.cloudflare.com/ajax/libs/font-awesome/6.4.0/css/all.min.css>" integrity="sha512-iecdLmaskl7CVkqkXNQ/ZH/XLlvWZOJyj7Yy7tcenmpD1ypASozpmT/E0iPtmFIB46ZmdtAc9eNBvH0H/ZpiBw==" crossorigin="anonymous" referrerpolicy="no-referrer" />
Add styling to the body element in app.css
Let’s go to our global CSS stylesheet and add a bit of styling.
body {
    display: flex;
    align-items: center;
    justify-content: center;
    min-height: 100vh;
    background: #3A4454;
}
Style the Index.razor
Now let’s add the main styling to our razor page for this, you need to create a new CSS file named Index.razor.css so once you did this you can add your scoped styling.
* {
    margin: 0;
    padding: 0;
    box-sizing: border-box;
    font-family: 'Segoe UI', Tahoma, Geneva, Verdana, sans-serif;
}

.container {
    width: 100%;
    background: #fff;
    border-radius: 10px;
    padding: 30px;
    text-align: center;
}

.wrapper {
    border-radius: 5px;
    border: 1px solid #bbb;
}

.wrapper .text-input {
    display: flex;
}

.text-input .to-text {
    border-left: 1px solid #bbb;
    border-radius: 0px;
    background-color: #f7f7f7;
}

.text-input textarea {
    height: 250px;
    width: 100%;
    border: none;
    outline: none;
    resize: none;
    font-size: 30px;
    border-radius: 5px;
    background: none;
    padding: 10px 15px;
}

textarea::placeholder {
    font-size: 30px;
    color: #878787;
    font-weight: 400;
}

.controls , li{
    display: flex;
    align-items: center;
    justify-content: space-between;
}

.controls, li, .icons , .icons i{
    display: flex;
    align-items: center;
    justify-content: space-around;
}

.controls {
    list-style: none;
    padding: 12px 15px;
    border-bottom: 1px solid #bbb;
}

.controls .row select {
    border: none;
    outline: none;
    font-size: 18px;
    background: none;
}

select {
    cursor: pointer;
}

.controls .exchange {
    color: #9f9f9f;
    font-size: 16px;
    cursor:pointer;
}

.exchange {
    border-radius: 50%;
    border: 1px solid #ddd;
    padding: 15px;
}

.detected-text {
    text-align: start;
    margin-left: 10px;
}

.container button {
    width: 100%;
    padding: 14px;
    margin-top: 20px;
    border: none;
    outline: none;
    cursor: pointer;
    border-radius: 5px;
    font-size: 17px;
    background-color: #007bff;
    color: #fff;
}
Ready to test your app
This is it now you should have a fully working clone of Google Translate. As I told you at the beginning you can detect languages, get a collection of the languages supported by the API and translate sentences from one language to another, the app is not perfect and can have some improvements but I had tons of fun building it and I hope you did as well.
Check out the repo on GitHub
If you had any trouble or I had a typo you can check out the repository on GitHub.
 Osempu
Check out the live version
There is also a live version of this app hosted for free as an Azure Static Web App you can check it out here
Thanks for your reading and for your support!
As always thanks for reading my post and for your kind words and support with your thumbs up. I had a great time coding this app and hope you enjoy it and it helped you to learn more about blazor and C#, when I was learning these were the kind of tutorials that I wish I had found that are fun to code and have a bunch of code to learn from. Keep posted as I will continue posting projects like these using ASP NET Core technologies (Blazor, MVC, razor pages, etc) that will be really cool as we progress and they will begin to get harder and harder as we go.
Remember to follow me on my blog Unit Coding and on my youtube channel under the same name Unit Coding as I post content every week.
Thanks for everything guys I hope you have a great weekend and keep coding!